Getting listed in popular search engines like Google is a great way of getting free and organic traffic to your website. Organic traffic is still considered to be the most valuable traffic in the world because search engines were always rated as the most trusted source of information and news.

How To Submit Your Website To Google
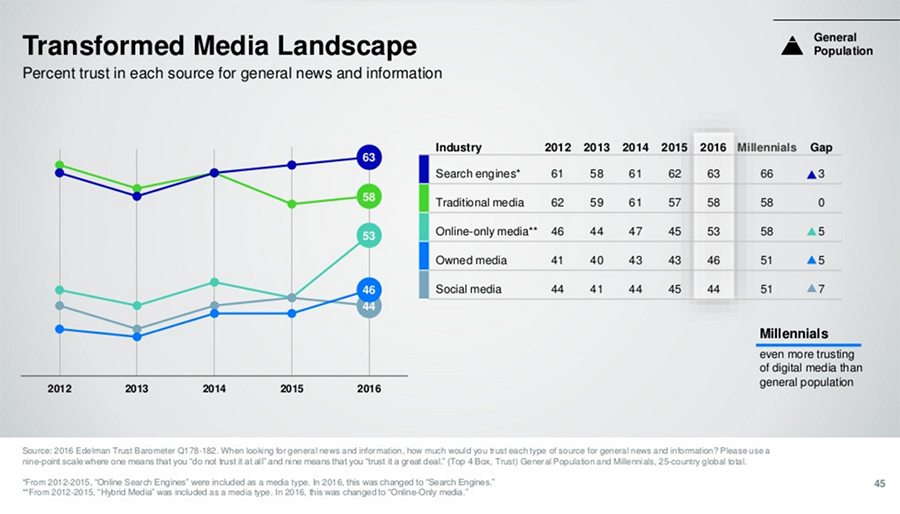
We are willing to bet that you’d want more organic traffic to your website. It is the source of over half of all web traffic, on average. If your website is not showing up in the Google search results at all, then you have two choices.
The first one is the slowest way and is to sit back and wait for Google to find and index your website naturally which could take weeks, months, or sometimes Google will not find and index your website at all.
The second one requires a bit of effort but gives you much faster results and gets your website indexed as quickly as possible. This will give you more time to work on other important things, such as improving your conversion rate and writing great and useful content.
How Search Engines Work
You could have an amazing website with valuable content but none of that matters if Google spiders don’t tell the search engine that your pages are there, to begin with. Google is using a huge number of computers and servers that crawl billions of web pages on the internet. This is Google’s web crawling bot called Googlebot or a spider. Googlebot is using a process called crawling that discovers new but also updated pages on the internet that are then added to the Google index.
Google uses a complicated algorithm that determines which websites to crawl, how often, and how many pages to fetch from each of those websites. It also looks for broken links. If you’ve updated your sitemap, then Google will probably discover new pages and then list them accordingly.
Google is crawling the internet all the time so you may never need to submit your website to Google because there’s a good probability that it’ll be discovered automatically by Googlebot. The problem here is that Google’s timeframe to crawl and index content is not very reliable and you may not get indexed as quickly as you’d want. The spiders are using a process called indexing that is essentially a way of collecting and processing all the data they find on the websites and pages during their crawl. Spiders will then add all of that new information to the Google’s index. They process text on the page, title tags, alt text for images and also location of keywords on the page.
The spiders always start with pages that are already in the Google index from the previous crawl sessions. After that, it adds in data from the sitemaps and then it uses links on all the pages it’s crawling and adds those new linked pages. Other search engines work in a similar fashion with some variations in their own algorithm.
If you’d like to check if your new website is indexed by Google, then simply type site:yourwebsite.com in Google. If Google indexed and crawled your site already then you’ll see a list of results similar to ours:

If nothing shows up, then is very likely that Google hasn’t found your website yet and the next step should be to create a sitemap.
Submitting Website URL Manually
There are many search engine submission websites that you can use to submit your website URL. But you should know that is far from reliable as a go-to method for getting your website indexed. Most people choose to ignore these websites as they are very inefficient and possibly harmful.
You can also submit your website directly to Google but logging in to your Google Search Console account and clicking on “Submit URL”. After that, you just have to hit “Submit Request” button and is done.
Adding A Sitemap To Help With Indexing
Sitemap is an XML file that lists all the pages on your website along with metadata about each of those URLs like when it was last updated, how often content changes on the pages, etc.
Sitemap does not affect your search rankings but they will certainly help your website get indexed. Submitting a sitemap to Google will help them know all about the URLs on your website which will result in your content and pages get crawled and indexed. That doesn’t mean your pages will get instantly indexed just because you have a sitemap, but is definitely an effective tool that you should be utilizing since is very easy to implement and is free.
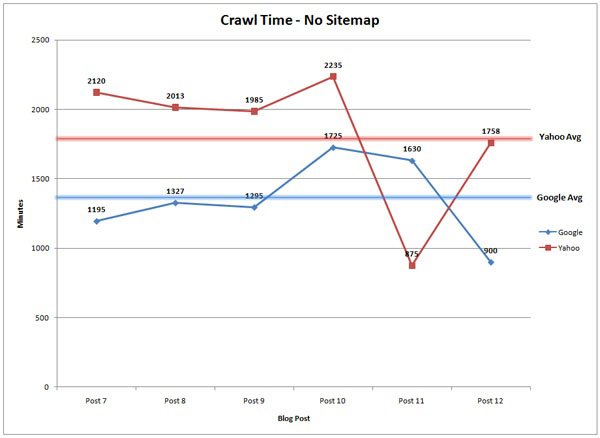
There was a case study done on this very topic to see how long it would take Google and Yahoo to crawl and index content when there was no sitemap on the website and when they used one. In the first case, the content was published as normal without submitting the sitemap. It took Google 1.375 minutes to crawl and Yahoo took 1.773 minutes.
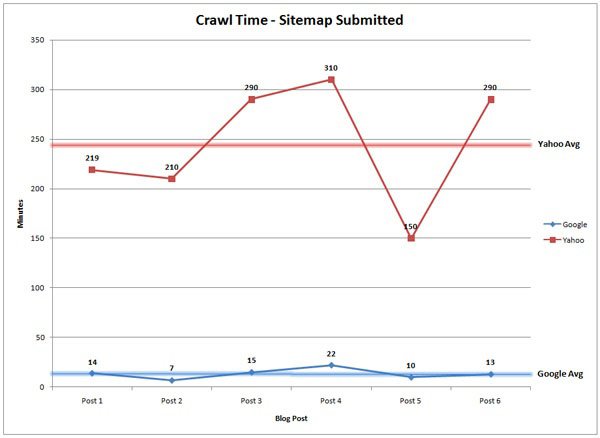
After that, they submitted an updated sitemap after adding some new pages and the average time it took Google bot to visit the page dropped to 14 minutes and Yahoo bot took 245 minutes. That’s a huge difference right there!
You can specify in the sitemap how often Google should check for changes on your website and pages. If you are running an e-commerce website, then you’d want Google to come back often and check on the changes.
If you are using WordPress then you can very easily create the sitemap and submit it by installing Google XML Sitemaps plugin. In the settings you can set how often a sitemap should be updated and submitted. The process for adding new pages to the sitemap and submission is automated.
Google Search Console is a very helpful tool by Google that is free and it enables you to monitor and maintain your website. In it, you can see how people are finding your website, the device they are using and which pages on your website have the most traffic. You can use it to create your robots.txt file, pinpoint any errors on your website and even submit a website. Click here if you’d like to learn all the details on properly using the Google Search Console.
So, if you are using Google Search Console, you can easily add and test your sitemap. First, log in to your account and click “Add a Property” button to add your new site’s URL.

A popup box will appear where you’d need to enter your site’s URL and click “Continue” button.
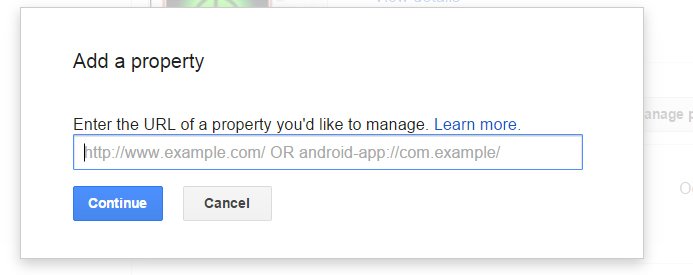
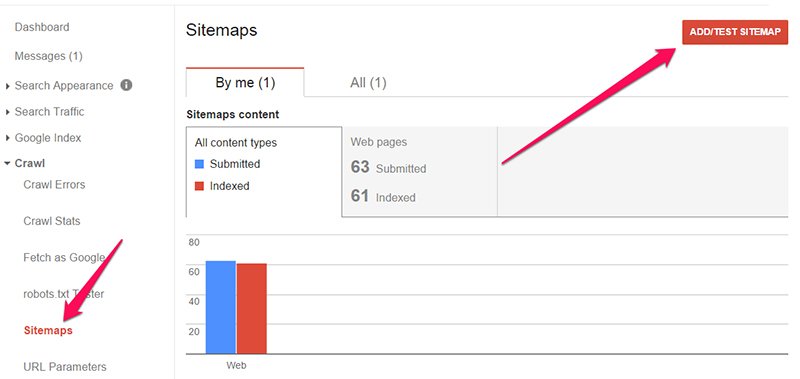
Google will provide instructions on how to add and verify your website. Once your site is added, click on the “Sitemaps” under “Crawl” menu on the left and click “Add/Test Sitemap”.
Tips For Using Robots.txt File
Robots.txt file is a basic text file that is placed in the root directory of the domain. So, if you are using WordPress, it’ll be placed in the root directory of your WordPress installation. Is a file that gives specific instructions to various bots like Google and Yahoo bot. Instructions restrict or allow which pages those bots can crawl and index and which pages they need to skip and ignore.
When Google’s spiders find and try to crawl new domain, they first have to check the instructions in a robots.txt file before they do anything. If the robots.txt file is missing, then the bot will crawl every page on the website. Some of the reasons someone would need to block access to specific pages or files would be that you might have two pages with the same content on your website because you are doing some split-testing and that represents a big problem for SEO. So in this case, you could simply block access to one of those pages in the robots.txt file.
To check if you already have a robots.txt file, log in to your FTP or go to file manager in your cPanel. If is not there, you can create one quickly using basic Notepad that comes with your operating system. Be sure to use plain text editor because other editors like Microsoft Word and Word pad can add some invisible codes to the document which can mess things up.
The format of a robots.txt file is very simple. A user agent represents the bot that you want to notify of a rule. An asterisk means that it speaks to all bots. If you’d want to tell them not to crawl and index a specific page, then write disallow. For user agent, you can add certain bots that you’ll have a specific rule for.
You can also disallow some file types, e.g. *.png, and that would block bots from accessing any .png image on your website. Overall, you don’t want to mess around too much with this file unless you know exactly what you want to do and how to do it. If you want to know which bots are accessing your website and you are using cPanel, then head over there and scroll down to where it says logs. If you notice bots from Majestic or Ahref’s, that means that someone is probably trying to reverse engineer your SEO, so you can take those bots and put them in the robots.txt file to stop others looking at your link profile. If you are using Google Search Console, you can edit the robots.txt file directly from there. You can also check if you set it up right and how Google is interpreting the information contained in the file.
Google’s Fetch and Render
This is a great feature that is available for anyone who is using Google Search Console and has their site verified. It enables you to test and see how Google renders and crawls any URL on your website. A good use of this tool is to see whether Googlebot has access to a page on your website and if any resources are blocked to the robot. When you use this feature, Google will send a robot to crawl this page and you can specify which platform to fetch it for (desktop or few forms of mobile).
Next, you can select either fetch or fetch & render. Fetch is more of a quick check that displays the HTTP response and covers basic errors, security issues, connectivity, and redirects. Fetch & render is a deeper view where robots crawl the URL and display the page the way a browser would on a specific platform (desktop or smartphone). It also runs all the resources on that page such as images and scripts. Use it to differentiate between how Google robot sees the page and how would a user see it.

If you want to fetch your homepage, then leave the box blank. The entire process takes less than 25 seconds. You’ll get a page of code which is exactly what Googlebot sees. This will give you more insights on certain elements that spiders don’t have access to or can’t see. It will go through the entire page and all the links on it (links to pages, images, JavaScript files, etc.).
When the process is done, you’ll see two images like below. One is how Googlebot sees the page and another is how the visitor would see it:

After the fetch is done, you can see the status:

Partial means that there were no issues during the crawl, but that there were other parts the bots couldn’t reach, most likely because they were blocked by robots.txt file. Clicking the path link in the column will show you which pages are at issue. This error could mean that some image took too long to load or that link is broken. You should examine that page for any resources that were blocked that are preventing the robot from properly crawling and analysing the page.
Once your URL is fetched, you’ll also have the option of submitting that URL to Google index (button will appear if is available). There are certain things that you can disallow from crawling, such as social media buttons, website analytics scripts, or fonts as they don’t really contribute to the visible content or layout. Keep in mind that there’s a weekly quota of 500 fetches and you’ll see a notification when you approach that limit.
CONCLUSION
There you have it – all the methods that you need to know for getting your new website or pages indexed as quickly as possible by Google. There are some other minor techniques available, but what you have here is more than enough, whether you are just a small blogger or running a full e-commerce website.
Based on everything we touch upon in this article, we can conclude that it’s best to manually submit any pages that are critically important and that need to be indexed as quickly as possible. You can let Google naturally find, crawl, and index other pages that contain just minor updates or generally content that is not of a real importance. Also, if your sitemap is properly configured to add new pages and submit them (or if you are doing it manually), then you have everything you need to be on the right track.


