
This tutorial shows you how to set up Mac Mail to work with your POP3 email account. For tutorials on setting up your Email on other platforms, please see our other Email Help Guides.
To Set Up Your E-mail in Mac Mail
- Open Mac Mail. If this is the first time it has been used, a Setup Assistant window will appear. If you have used Mac Mail before, select “File” > “Add Account.”
- Full Name: Enter your first and last name. This is the name that will appear in the “From” field of messages you send.
- E-mail Address: Enter your entire email address (e.g., someone@mydomain.com).
- Password: Enter the password for your email account.
- Click the “Continue” button.
Mac Mail: Incoming Mail Server
- Account Type: Select “POP3” from the drop-down menu.
- Description: Enter a descriptive name for your email account such as Work Email or Home Email.
- Incoming Mail Server: mail.yourdomain.com
- User Name: Enter your entire email address (e.g., someone@mydomain.com).
- Password: Enter the password for your email account.
- Click the “Continue” button.
- Mac Mail will now attempt to detect the incoming server settings. Once detected, Mac Mail will continue to the Outgoing Mail Server setup screen.
Mac Mail: Outgoing Mail Server
- Description: This field is optional. Enter a descriptive name for your email account such as Work Email or Home Email.
- Outgoing Mail Server: Your Internet Provider’s SMTP setting
- Check the “Use only this server” box.
- Do not check the “Use Authentication” box.
- Click the “Continue” button.
- Mac Mail will now attempt to detect the outgoing server settings.
- When the setup process is complete, you will see an “Account Summary” window that summarizes your connections. Click the “Create” button.
Mac Mail: Mail Preferences
- Select “Mail” > “Preferences.”
- Click the “Accounts” tab.
- Click once on your account.
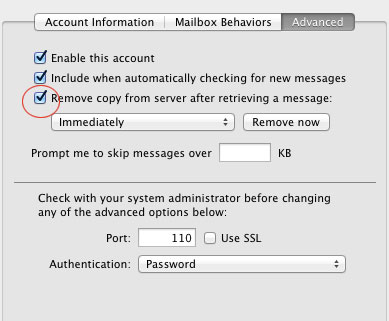
- Click the “Advanced” tab.
- Select the “Remove copy from the server after retrieving a message” check box, if desired.
- If you selected the check box, click the drop-down menu to indicate when Mac Mail should remove your mail from the server. Or you can indicate that Mac Mail should remove your mail from the server when you move it from the Inbox into another folder.
- Close the “Accounts” window.
Removing message copies from the web server
1. Click on Mail from the top menu
2. Click on Preferences
3. Click onAccounts (the @ symbol)
4. If you have more than one Email account, select the account you want to edit and Click Advanced
5. select the Remove copy from server after retrieving a messagecheck box. You can also remove messages currently saved on the server by clicking the Remove now button.
6. Click Save
This will ensure your messages are always downloaded to your Mac, and prevent your mailbox quota from being exceeded.
NOTE: As a courtesy, we provide information about how to use certain third-party products, but we do not endorse or directly support third-party products and we are not responsible for the functions or reliability of such products. Apple® is a registered trademark of Apple Inc. in the United States and/or other countries. All rights reserved.
NB: This tutorial was sourced from here


