This tutorial shows you how to set up Entourage to work with your e-mail account Mac OS X. For tutorials on setting up your Email in Microsoft Outlook, please see our other Email help guides.
To Set Up Your E-mail Account in Entourage
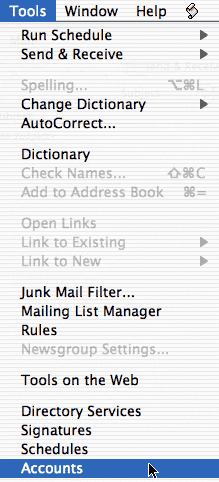
1. Click on the “Tools” menu and select “Accounts“.
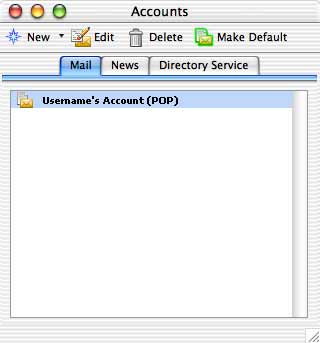
2. In the “Accounts” window which appears, Select your email account and click on the “Edit” button.
3. On the “Account Settings” window, enter your information as follows:
Account Name
The name by which Entourage refers to these settings (we recommend entering your full Email Address)
Include this account in my ‘Send & Receive All’ schedule
This should be selected for Entourage to check for new messages from this account when you click “Send/Receive”
Name
Your first and last name.
E-mail Address
Your full Email address.
Account ID
Your full Email address, again.
POP server
“mail.your-domain.com.au” (where ‘your-domain.com.au is replaced with your actual Domain Name.
Password
Your Email account password supplied to you by Quikclicks. If you’d like Entourage to remember your password, check the box labeled “Save password in Mac OS keychain.”
SMTP server
“your-outgoing-mail-server” (where ‘your-outgoing-mail-server is replaced with your specific Internet Provider’s Outgoing Mail Server (EG. “mail.bigpond.com” if you use Telstra Bigpond to connect to the Internet, “mail.optusnet.com.au” for Optus, “mail.tpg.com.au” for TPG, etc). Click here for more help.
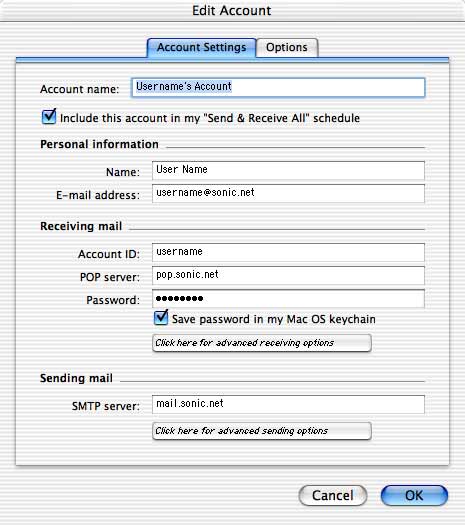
4. Click “Ok” to complete the setup process.
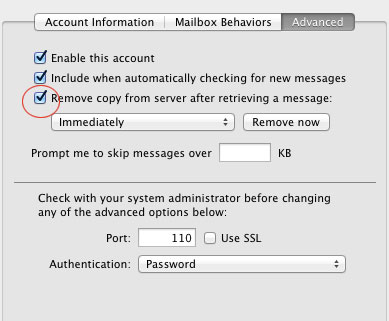
Removing message copies from the web server
1. Click on Mail from the top menu
2. Click on Preferences
3. Click onAccounts (the @ symbol)
4. If you have more than one Email account, select the account you want to edit and Click Advanced
5. select the Remove copy from server after retrieving a messagecheck box. You can also remove messages currently saved on the server by clicking the Remove now button.
6. Click Save
This will ensure your messages are always downloaded to your Mac, and prevent your mailbox quota from being exceeded.